
In this tutorial you will create a contrast discrimination test using an adaptive method. Two gratings are presented at the same time and the participant must judge which one has the highest contrast.
One of the stimuli (target stimulus) is always presented with the same contrast and the other with a contrast that is always greater than or equal to the first.
Starting from a large value, the second contrast varies from trial to trial depending on the previous response. If the previous response is correct, the contrast decreases, and if it is incorrect, the contrast increases.
Depending on the adaptive method you have selected, the end point you reach will be different:
- 1up/1down: After a correct response, the variable steps down, to the previous value in its list.
After an incorrect response, the variable steps up, to the next value in its list. - 1up/2down: After two consecutive correct responses, the variable steps down, to the previous value of its list.
After an incorrect response, the variable steps up, to the next value of its list.
To get to the relevant values faster, a 1up/1down method is applied until the first incorrect response, then the method changes to be 1up/2down. - 1up/3down: After three consecutive correct responses the variable steps down, to the previous value of its list.
After an incorrect response, the variable steps up, to the next value of its list.
To get to the relevant values faster, a 1up/1down method is applied until the first incorrect response, then the method changes to be 1up/3down.
The 1up/1down method targets the stimulus intensity at which either of two possible responses is equally likely to occur. In a 2AFC task, like this one, 50% correct corresponds to chance performance.
1up/2down method targets 70.71% correct.
1up/3down method targets 79.37% correct.
Information about adaptative methods comes from chapter 5 of Psychophysics, a practical introduction, 2016, Frederick A.A. Kingdom, Nicolaas Prins.
Continuos color resolution
When using stimuliApp, images are displayed in an sRGB space with 256 possible values for each channel of the RGB color. If you are working only with luminances: R = G = B, there are 256 luminance levels.
When using stimuliApp, images are displayed in an sRGB space with 256 possible values for each channel of the RGB color. If you are working only with luminances: R = G = B, there are 256 luminance levels.
In this test the participant must discriminate between different contrast values, so limiting the number of different luminance intensities that can be displayed can be a issue.
In the scene properties there is a property named continuosResolution. Making this property true a noisy-bit method is implemented.
This method consists of adding a small amount of random noise.
The method is described in Allard, R., Faubert, J., 2008. The Noisy-Bit method for digital displays: Converting a 256 luminance resolution into a continuous resolution. Behav. Res. Methods 40, 735–743.
The noisy-bit method, combined with the 256 luminance levels, is perceptually equivalent to an analog display with a continuous luminance intensity resolution when the spatiotemporal resolution is high enough that the noise becomes negligible.
To see the method in action, create a simple path stimulus.
Change the value of the color to luminance and make the colorLuminance time dependent with a linear function.
Change the coloLuminanceSpeed to 0.001 per frame. Preview the stimulus and the stimulus will change its color smoothly from black (luminance=0) to white (luminance=1).
Go to the Section menu, create a section and a scene and add an object from the stimulus. Now you can preview the scene and move it forward frame by frame. We have set 1000 different luminance values that change each frame. Sometimes you will notice a change in luminance from one frame to another. This happens approximately every 4 frames because the number of real values we can present is 256 and we have 1000 different values.
Stop the preview and change the value of continuosResolution to true. If you preview the scene frame by frame again, you will note be able to notice the changes in luminance because the added noise makes the luminance resolution continuos.
In this test, as we work with contrast values we will set the continuosResolution property to true, but keep in mind that the property has a computational cost, so make sure that the frame rate of your test remains steady. Chances are you can only run this test smoothly at 60Hz but not at 120Hz. You can change the frame rate at which the test runs from the Test menu.
Creating the stimuli
Create a new test and name it contrast.
Create a new stimulus and name it grating.
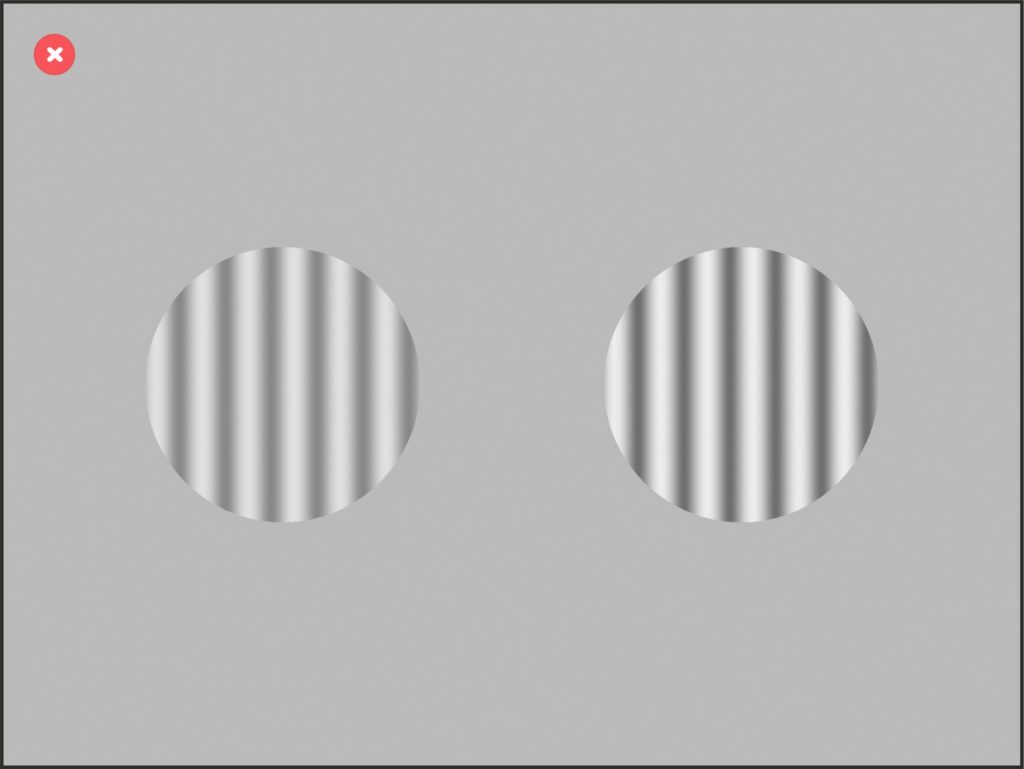
Change its type to grating. Change its shape to ellipse and its size to 600 pixels.
Change the contrast to cosine and the contrastCosineValue to 0.8 to make the border of the stimulus a little bit smoother.
Preview the stimulus:

You will present 2 stimuli at the same time. Each one in a different position and with a different contrast value.
Change the position to cartesian vars, and change the positionX to variable.
Change the contrastValue to variable.
Creating the lists of values
Create a list of numerical values and name it xPositions. Add the values for the x position of the stimuli: -500, 500.
Create a list of numerical values and name it contrastTarget. Add one only value 0.5
Create a list of numerical values and name it contrasts. Add a logarithmic sequence of 15 values from 0.5 to 0.7.
Creating the section and the scene
Create a new section and within that section a new scene.
Within the Background and layers group, change the continuosResolution to yes.
Create 2 objects in the scene, both from the grating stimuli.
Go back to the section and select the scene1_object1_positionX. Add the scene1_object2_positionX as a related variable.
Select the list xPositions as the list of values for both variables.
Change the selectionMethod to one random value and the selectionMethodEqual to different. With this, the value of the first variable is chosen randomly and the value of the related variable is also chosen randomly, but they cannot be in the same position in their respective lists.
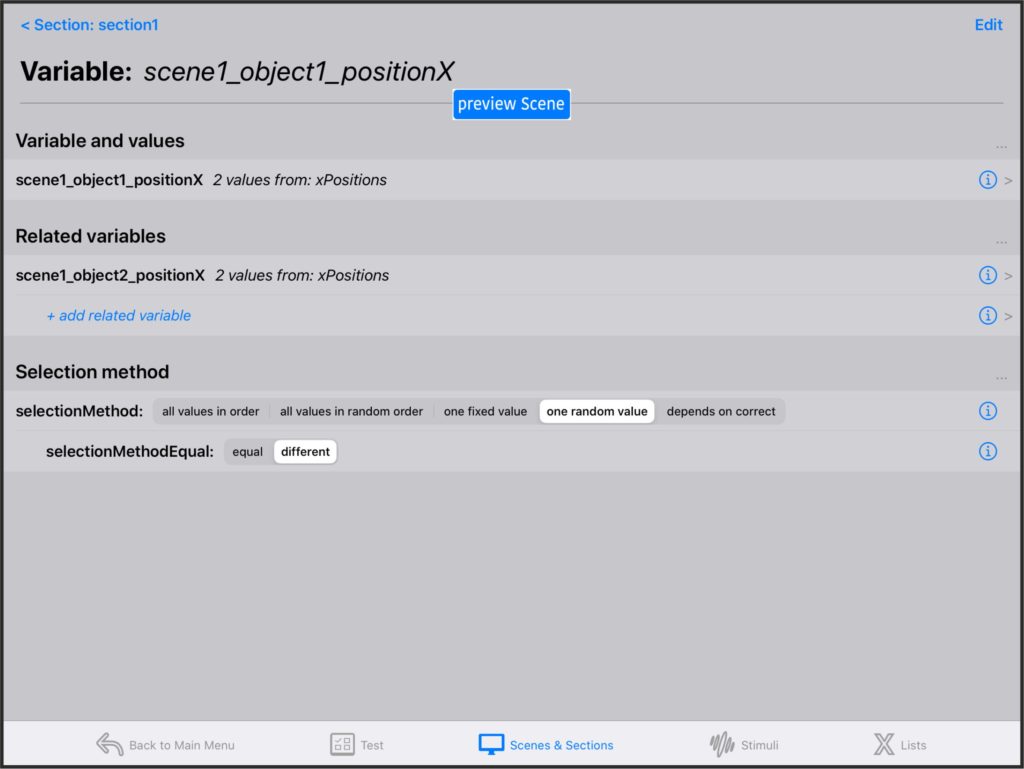
Since you are using the same list for both of them and the list has only 2 values, when the first variable takes the first value, the second variable takes the second and vice versa.
Return to the section and select the scene1_object1_contrastValue and then assign it the contrastTarget list.
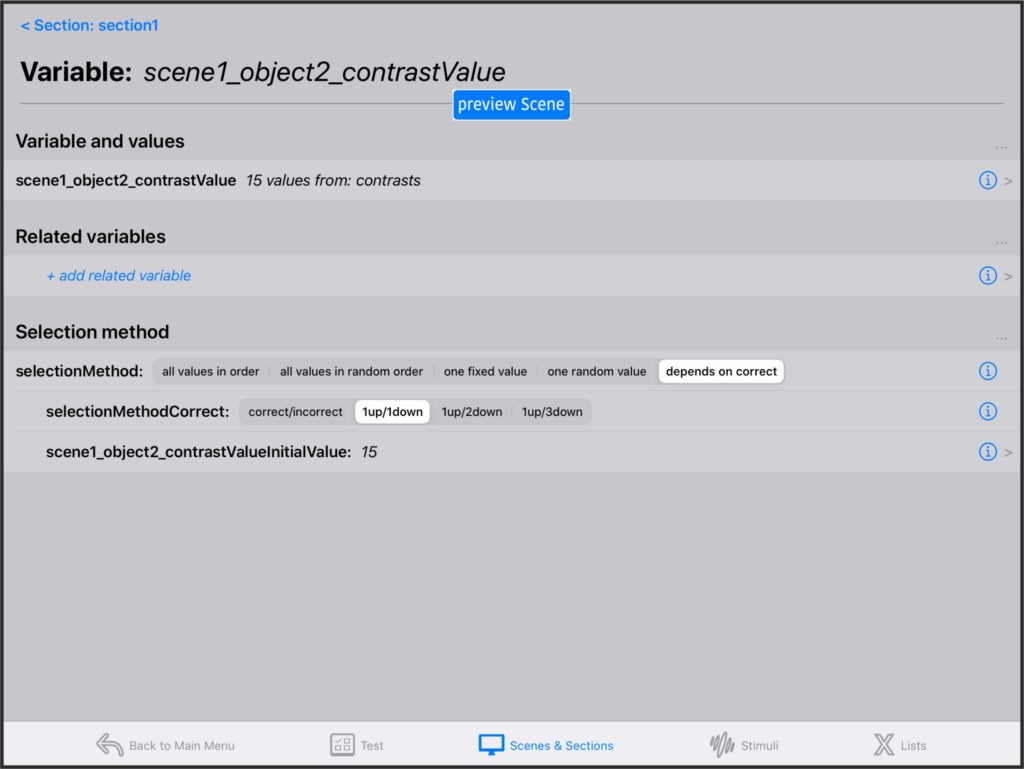
Go back again to the section and select the scene1_object2_contrastValue and assign it the contrasts list. Change the selectionMethod to depends on correct, and the selectionMethodCorrect to 1up/1down. Set the initial value to 15 (the last value in the list).
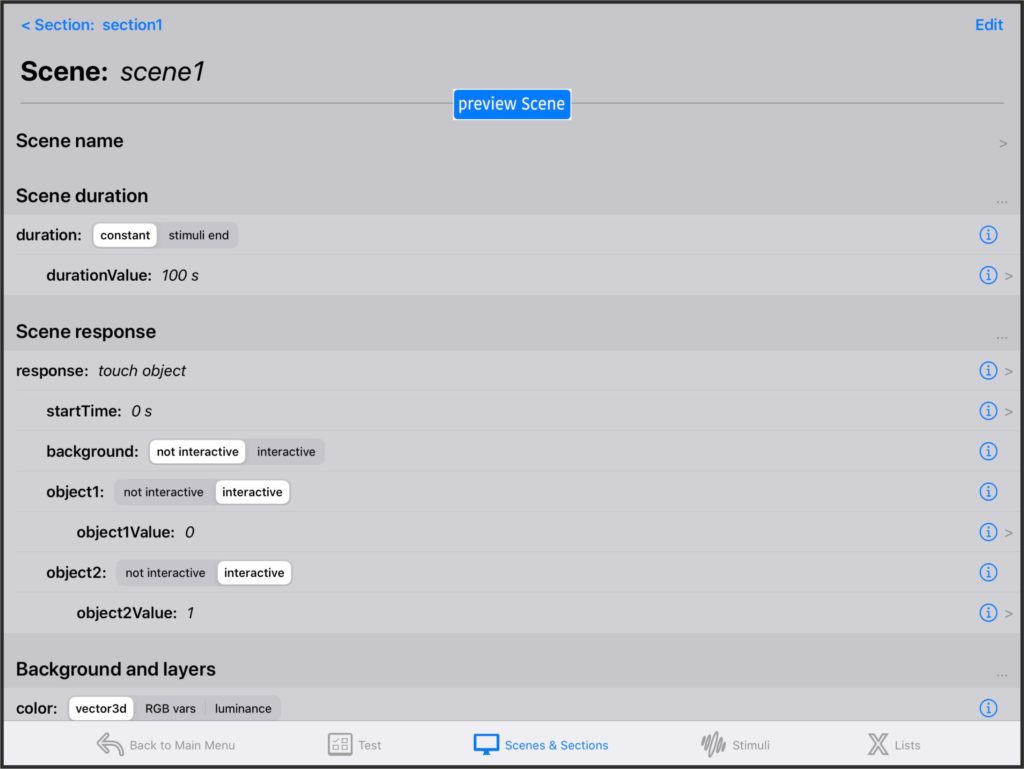
Go to the scene1 and add a touch object response. Both object1 and object2 must be interactive and the background must not. Change the object1Value to 0 and the object2Value to 1.
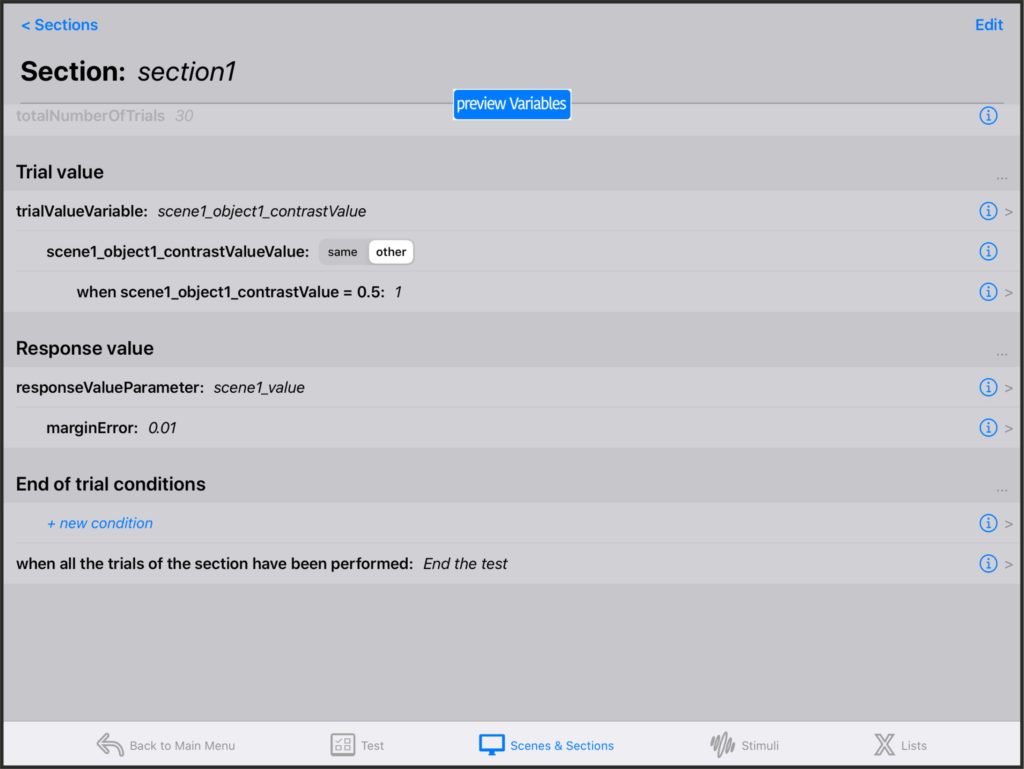
Return to the section and select trialValueVariable, choose scene1_object1_contrastValue. Change scene1_object1_contrastValueValue to other. And make the value = 1 when scene1_object1_contrastValue = 0.5.
Change the responseValueParameter to scene_value.
You could have used other variable to set the trial value because what you want is simply that the trial value is always 1 and the response value is 0 when the participant touches the target stimulus and 1 when the participant touches the stimulus with variable contrast. This way, when the participant touches the variable stimulus, its contrast decreases, and when the participant touches the target stimulus the contrast of the variable stimulus increases.
Change the number of repetitions of the scene to 30.
Now you can add another empty scene in the section with a duration of 0.5 seconds. This way, after a response, there will be a short pause before the next stimulus presentation.
Go to the Test menu and change the firstSection to section1.
Run the test
Now run the test. After correct response, the variable stimulus will decrease contrast and after an incorrect response the variable stimulus will increase contrast. After a few repetitions, the participant will be responding for a range of contrasts that are not distinguishable of the target contrast.
Change the selection method to 1up/2down, after a few responses, the variable contrast will be in the range where 70,71% of the responses are correct.
Change the selection method to 1up/3down, after a few responses, the variable contrast will be in the range where 79.37% of the responses are correct.